

 By Gusto Guitar
Choose six strings for the individual-note control you need, or twelve for a paired-string texture that earns its place in the arrangement—and evaluate the extra setup and performance demands.
A 6-string vs 12-string comparison concerns different string arrangements and musical roles, rather than simply a larger number of independent notes. A conventional twelve-string groups its strings into six pairs, so familiar chord shapes can produce a different result without becoming twelve independent playing lanes. That texture can be valuable, but it should be tested in the song, through the intended amplifier and with the practical demands of playing and maintenance understood.
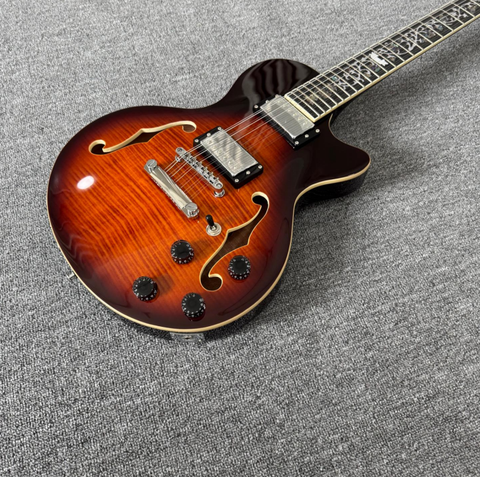
Gusto Guitar GT12String-01 reference image. Confirm the current model’s course arrangement, hardware and approved setup before ordering.
Understand the courses in a 6-string vs 12-string comparison
On a typical twelve-string, the lower four courses combine a principal string with an octave partner, while the upper B and E courses are paired in unison. Taylor’s six- versus twelve-string explanation describes this paired-string concept. Its article concerns acoustic instruments; the basic course distinction is useful here, while its acoustic construction details should not be transferred to an electric model.
The practical consequence is that a familiar chord can include additional octave and unison content when both strings of each course sound. It is not the same thing as adding six new low strings. If your real need is a lower register, compare an appropriately configured instrument for that job rather than assuming twelve strings automatically provide it.
Also confirm how the strings are ordered within each course. Rickenbacker’s official FAQ explains that its twelve-strings place the normal string before the octave string. That is a manufacturer-specific arrangement worth checking rather than assuming every electric twelve-string follows the same order.
Give the twelve-string a defined role in a song
A repeated chord figure
Try the figure that made you interested in the instrument, at the tempo where you will use it. Listen to whether the paired notes add a useful rhythmic shimmer or make a dense part less distinct. A slow demonstration chord does not reveal how that texture behaves through fast changes.
An exposed arpeggio
Play the strings individually through the chord, aiming to sound both members of each course where intended. Check whether the picking motion produces an even result. The challenge is different from playing a six-string line and adding an effect afterward, because the paired strings are part of the physical performance.
A supporting layer in a full arrangement
Compare the part with the other instruments present. A texture that seems full and impressive alone may require fewer notes or a different register in a busy arrangement. Try a partial chord before deciding that the instrument itself is unsuitable.
Keep the six-string’s strengths in view
A six-string lets you address each of its strings individually without a paired partner. That can suit parts that depend on a particular bend, selective articulation or tightly controlled single-note response. Do not describe it as an incomplete twelve-string; it offers a different relationship between the hands and the sound.
If most of your work involves those techniques, a twelve-string may be a specialist addition rather than the best replacement for your main guitar. Write down which parts benefit from the paired texture and which you still prefer on six strings. That separates a useful second instrument from a purchase expected to do every job.
An effect pedal can create another useful texture, but audition that as its own solution. It does not change the physical strings under your hands. Compare the results in the intended music instead of declaring one approach a universal substitute for the other.
Assess the left hand with real chord changes
Start with chord shapes you already use. Listen to each course, checking whether both strings ring or whether a finger accidentally silences one member. Then repeat a change at performance speed. The instrument may feel comfortable for a held chord yet require an adjustment to your placement during movement.
Neck width alone cannot settle this test. The spacing between courses, spacing within each pair, neck profile and setup all contribute to the experience. Try the actual model or obtain measurements and a relevant demonstration if buying remotely.
Include any barre chords and upper-position shapes in your repertoire. Avoid solving every unclear note by pressing harder. If the effort seems excessive, ask a competent technician to assess the setup and your teacher to assess the technique before deciding the instrument must simply be difficult to play.
Listen to pairs through the amplifier you will use
Begin with a relatively clear setting. Play a sustained chord and an arpeggio, then change register. Listen for how the paired notes interact and whether the intended harmony remains readable. If a course sounds unexpectedly wrong, check the individual strings before judging the whole instrument’s tonal character.
Next, introduce the compression, drive, modulation or ambience relevant to the part. Add one change at a time so you can identify what helps and what masks detail. Twelve sounding strings do not remove the need to leave space in an arrangement, and a large effect chain can obscure the qualities you are trying to evaluate.
Finally, compare levels with your six-string at a sensible listening volume. A louder demonstration should not win automatically. Note which amplifier settings you would need when changing instruments during a set and whether that change is practical.
Use a task-based comparison
| Task | Six-string test | Twelve-string test |
|---|---|---|
| Main rhythm part | Check attack and space between chord changes. | Check whether the paired texture supports that rhythm. |
| Arpeggiated figure | Listen to the definition of individual strings. | Listen to the consistency of the two strings in each course. |
| Lead phrase | Evaluate the bends and articulation you normally use. | Decide whether paired-string articulation suits the same phrase. |
| Band context | Check the part against vocals and other instruments. | Try simpler voicings if the additional content crowds the mix. |
| Working routine | Record ordinary tuning, string changes and setup needs. | Allow for checking and maintaining twelve individual strings. |
Inspect the bridge and intonation arrangements
Ask how the model’s bridge adjusts and how its saddles support the paired strings. Do not infer the arrangement from the total string count or a distant photograph. A description should identify the actual hardware and the available adjustment method.
During the sample trial, compare open chords with fretted chords farther up the neck. If a discrepancy is audible, have the strings, tuning, fretting pressure and setup assessed. The purpose is to establish whether the instrument supports your usable chord vocabulary, not to promise mathematically perfect pitch in every situation.
An official electric example, the Rickenbacker 360/12W, lists its own scale and neck measurements. Such model-level documentation is a useful standard of specificity. It does not establish the bridge design or dimensions of another maker’s twelve-string.
Budget time as well as money for ownership
A twelve-string has twelve strings to identify, tune and replace. Before buying, check access to the tuning machines and the correct stringing route. Obtain the maker’s instructions and an approved string-set specification instead of adapting a six-string procedure by guesswork.
Do not fit an arbitrary set or choose a different tuning solely because someone recommends it for another instrument. Confirm the intended gauges and tuning for the model. If a change is wanted, arrange the appropriate technical assessment and setup rather than assuming every neck and bridge should be treated alike.
Keep suitable spare strings, especially when a performance depends on this one texture. Confirm local availability and the practical time needed for a string change. These are ordinary planning questions, not reasons to dismiss the instrument.
Decide whether it belongs in the studio, on stage or both
In a recording session, you may have time to tune, audition partial voicings and layer a short part. On stage, instrument changes, tuning checks and amplifier settings must fit the set. A guitar that is valuable for one context may still need another plan for the other.
Rehearse the complete transition: finish the six-string song, pick up the twelve-string, check tuning and start its first part. If the process is awkward, investigate a practical solution before adding more gear. The result should be a dependable performance routine, not just a pleasing isolated sound.
Identify the actual twelve-string arrangement in the extended-string guitar category. For a semi-hollow body, compare the semi-hollow guitar range while keeping string and tuning requirements specific to the selected model.
Common buying questions
Does a twelve-string use completely different chord shapes?
With a conventional six-course tuning, familiar shapes remain a starting point. You still need to check that both strings in the intended courses sound clearly and that the voicing suits the arrangement.
Is every twelve-string an acoustic-electric guitar?
No. Confirm the instrument type. An electric twelve-string and an acoustic guitar fitted with electronics should not be treated as the same product merely because both can be amplified.
Will it replace my six-string?
Only if it suits all the work you need it to do. For many players, the clearer decision is to give each instrument a distinct musical role and retain the techniques that work best on each.
See Gusto Guitar’s seven- and twelve-string electric category and ask for a current specification and chord-based demonstration. Compare the actual course arrangement and working setup before confirming an order.

Get Best Guitars
Join Gustoguitar.com Newsletter to get more information of electric guitars, classical guitars, and all kinds of guitars.


